
Using the designer
This page is about the authoring surface itself — what the people using your application will do with it. It is worth reading once even if you are only embedding it, because several behaviours are deliberate choices rather than accidents, and knowing them makes the difference between the designer feeling precise and feeling arbitrary.

Design and Preview
Design shows structure: data bindings appear as labelled chips rather than values, empty blocks show placeholders, and containers, repeaters, conditionals and page breaks are outlined and named. Preview substitutes the sample data and hides every affordance, so what you see is what the PDF will contain.
Tables show only the first few rows in Design (designRows, three by default) so a hundred-row table does not bury the rest of the layout while you are working on it. Preview shows every row.
Charts become interactive in Preview: point at a bar, slice or line marker and the rest dim while a tooltip names the category, the series and the value. Nothing is redrawn to do it — the shape being pointed at is the one the PDF will contain — and it is off in Design, where a hover belongs to selecting and dragging. interactiveCharts moves or removes it; see Charts.
Placing blocks
There are three ways to add a block, and they all end up in the same place.
Click, then click. A click anywhere on the page puts an insertion caret there — a thin blue line showing exactly where the next block will go. Click a block in the palette and it lands at the caret. This is the fastest route when you know where you want something.
Drag. Drag from the palette onto the page. A drop line shows the target as you move; an outlined box means you are over an empty container. Dropping beside a section rather than inside one puts the block in the section nearest the pointer.
Select, then insert. With nothing clicked on the page, a palette click appends after the current selection, or inside it if the selection is a container.
Whichever route you take, the canvas scrolls to where the block landed and flashes it briefly — which matters most when it landed on a page you were not looking at.

Finding a field
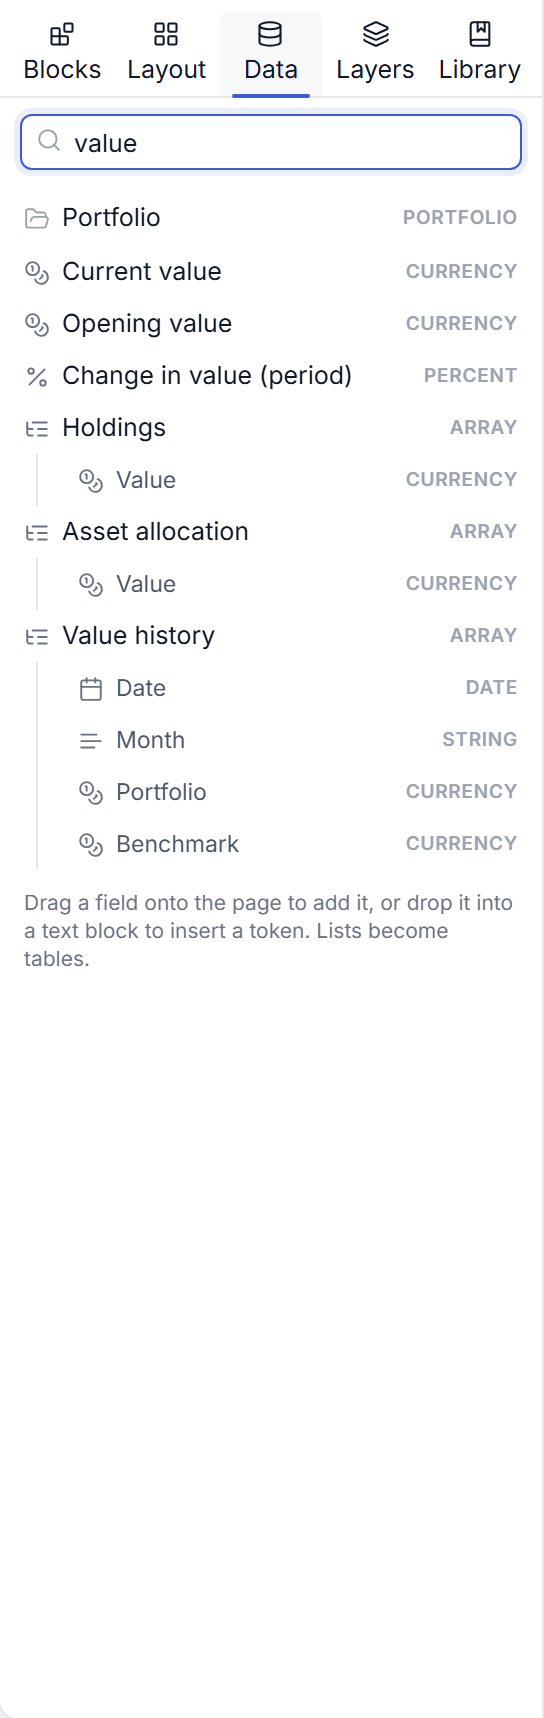
The Data panel is your schemas, as a tree. Searching matches on the whole path, so looking for value finds the one inside Holdings and shows you which parent it belongs to; sources with nothing matching disappear rather than sitting there as empty folders.
Fields inside a list are shown under it but greyed: they are addressed through a table's or repeater's row alias, so there is nothing to insert on its own. Drag the list onto the page instead and you get a table over it.
Typing data into text
Double-click any text or heading block to edit it in place. Inside, typing {{ opens a list of every field in your data sources, ranked so that what you would naturally type comes first — val puts portfolio.value above portfolio.holdings.value. Arrow keys choose, Enter or Tab inserts, Escape dismisses and leaves your text alone.
The result is a token: a single object that carries the expression, not a fragile piece of text someone can half-delete. The Field button in the formatting bar inserts exactly the same thing, for people who would rather browse than type.
To format a value — a currency, a date, a percentage — insert the field first, then use the inspector's format options, or write the pipe by hand: {{ portfolio.value | currency }}. See Dynamic bindings for the full expression language.
Text styles are offered by name — “Heading 1”, “Body text”, “Small print” — rather than by the id the template stores (h1, body, small). The ids are the contract and are visible in the document panel beside each style; the names are what the person choosing one reads.
Finding your way around
The Layers panel is the document as a tree. Clicking a row selects that block and scrolls the canvas to it, including onto pages that were not rendered yet. Each row can be dragged onto the canvas to move the block, and carries move-up, move-down and delete buttons on hover.
The breadcrumb along the bottom of the canvas shows the path to the selection, and each step in it is clickable — the quickest way out of a block nested several containers deep.
Controlling page breaks
Pagination is decided by BroadPaper, not by the browser and not by the PDF engine, and you control it from the Page flow section of the inspector:
- Keep together — never split this block across pages.
- Keep with next — do not leave this block stranded at the foot of a page. Headings do this by default, and a block that draws nothing does not satisfy it, so a heading followed by a conditional that is currently false still travels with its real content.
- Break before / after — force a new page at this block.
- Orphans and widows — the minimum number of lines to leave behind or carry over when a paragraph splits.
The Page break block is the direct route: drop it anywhere and everything after it starts a new page. Unlike keep-together, an explicit break is never traded away to make content fit, and it works at a section boundary as well as in the middle of one.
The one place it does nothing is after the last content in the document, where there is nothing left to move and a report ending on a blank page would look broken. That case is reported in the canvas warnings rather than passed over in silence.
Tables repeat their header row on every page they continue onto, and never leave a single orphaned row behind.
What the canvas is actually showing
By default the canvas measures with the browser, which is instant. If you supply createMeasurer, Preview measures with the same engine that renders the PDF, and then a page break you see there is a page break you get in the file.
Design mode always measures with the browser, because it draws things the PDF never contains — badges, outlines, drop targets, truncated tables. Its page breaks are therefore indicative; Preview is the one to trust. See Browserless PDF.
Designing with AI
When the host application has connected a model, the left panel has an AI tab. It does two things:
- New report. Say what the document is for and what it should show; the answer replaces the design, bound to the data the application provides.
- Edit report. Say what to change. With blocks selected, the change is held to those blocks — they may be changed, replaced or removed, and new blocks may go directly beside them — and everything else is left exactly as it was.
The instruction box takes up to 2,000 characters and counts them. Nothing is applied while the design is being made, and the canvas stays usable; Cancel stops it.
What comes back is shown before anything changes: the proposed pages beside a list of what would change. Accept applies it as one step, so a single undo puts the design back as it was. Discard leaves it untouched. If the design was edited while the proposal was being made, Accept is withheld — applying it would throw those edits away — and the panel offers to ask again.
A proposal has passed the same validation as any design before you see it, and more: a binding to a field that does not exist is refused rather than warned about. It is still a suggestion. Read it before you send a document made from it.
Requests that are not about designing the report are declined with "I can only help design BroadPaper templates." How it is set up is in AI template design.
Keyboard
| Key | Action |
|---|---|
Enter | Edit the selected block's text |
Escape | Stop editing, or clear the selection |
↑ ↓ | Select the previous or next sibling |
Alt ↑ ↓ | Move the selected block up or down |
← → | Select the parent, or the first child |
⌘/Ctrl C X V | Copy, cut, paste |
⌘/Ctrl D | Duplicate |
⌫ | Delete |
⌘/Ctrl Z / ⇧Z | Undo, redo |
⌘/Ctrl S | Save |
⌘/Ctrl + - 0 | Zoom in, out, reset |
Undo groups a typing burst into one step rather than one step per character, so undo goes back to something a person recognises.